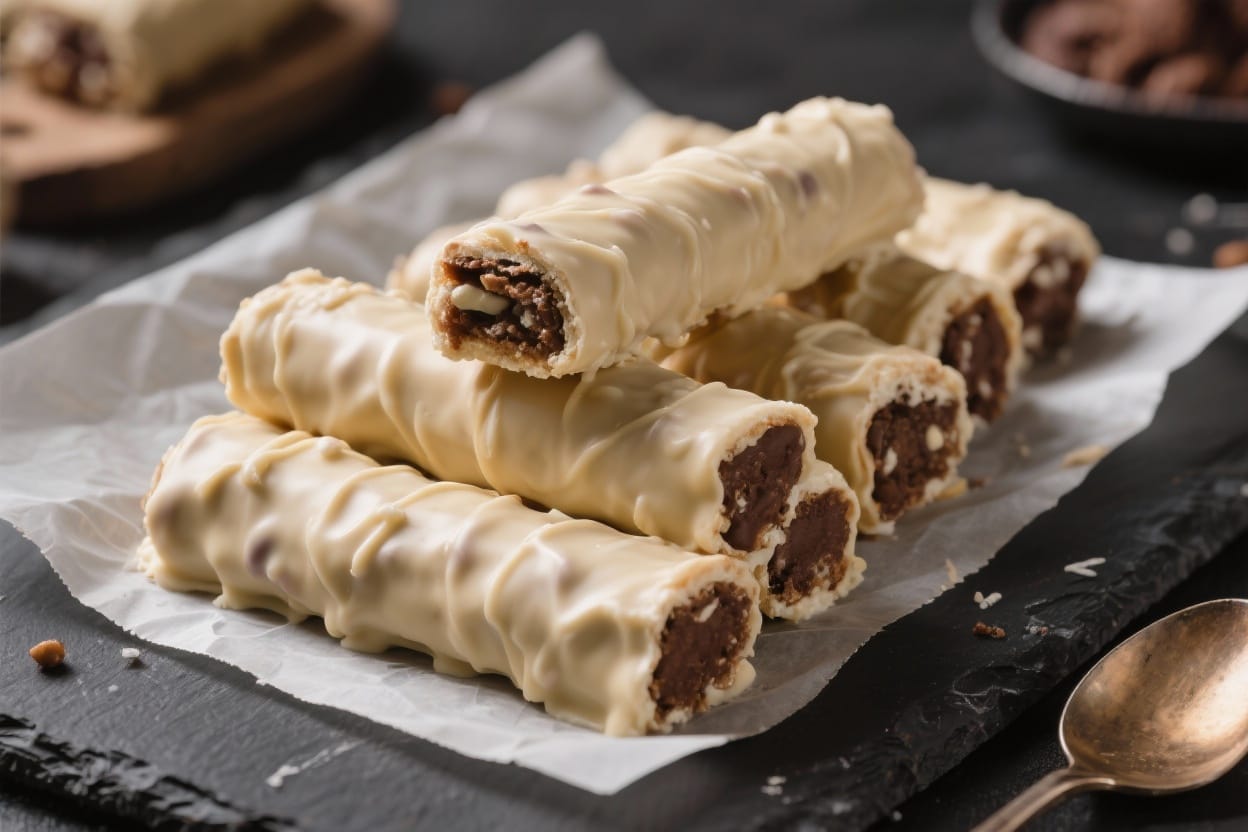
No-bake dessert dough logs are the kind of sweet treat you can pull together on a busy weeknight or when you need something last-minute for guests. They’re playful to make, simple to customize, and don’t require turning on the oven. Think of them as a cross between cookie dough and fudge—soft, sliceable, and loaded with mix-ins.
You can keep them classic with chocolate chips or go wild with nuts, candies, and spices. Once chilled, they slice into neat rounds that look great on a dessert board.
What Makes This Special

- No baking required: The freezer does all the work, so you avoid the wait and the heat.
- Beginner-friendly: The method is simple, forgiving, and hard to mess up.
- Customizable: Swap mix-ins to suit any craving—peanut butter cup, s’mores, or holiday spice.
- Make-ahead magic: Logs keep well in the fridge or freezer, ready to slice when you are.
- Great for gifting: Wrapped in parchment with twine, they look charming and travel well.
Ingredients
- 1/2 cup (1 stick) unsalted butter, softened
- 1/2 cup creamy nut butter (peanut, almond, or sunflower seed butter)
- 1/2 cup brown sugar, packed
- 1/4 cup granulated sugar
- 2 teaspoons vanilla extract
- 1/2 teaspoon fine salt
- 1 1/2 cups oat flour (or finely ground quick oats)
- 1/4 cup milk of choice (dairy or non-dairy), plus more as needed
- 3/4 cup mini chocolate chips or chopped chocolate
- Optional mix-ins (choose 1–2 cups total):Chopped nuts (walnuts, pecans, pistachios)Mini marshmallowsCrushed cookies or graham crackersDried fruit (cranberries, cherries, apricots)Shredded coconutSprinkles
- Coating (optional): cocoa powder, powdered sugar, finely chopped nuts, or shredded No Bake Dough Dessert Balls
Instructions

- Cream the base:In a large bowl, beat the softened butter, nut butter, brown sugar, and granulated sugar until smooth and fluffy. This takes about 1–2 minutes with a hand mixer or a sturdy spatula.
- Add flavor:Mix in the vanilla and salt until combined.
- Build the dough:Add the oat flour and mix until a soft dough forms.It will look crumbly at first.
- Adjust texture:Pour in the milk, 1 tablespoon at a time, until the dough is cohesive and flexible, like cookie dough you can shape.It should not be sticky.
- Fold in fun:Stir in chocolate chips and your chosen mix-ins. Distribute them evenly so every slice has a good mix.
- Shape the logs:Divide the dough in half. Place each half on a sheet of parchment.Use the parchment to roll and shape each portion into a log about 6–8 inches long and 1.5–2 inches thick. Twist the ends to seal.
- Chill to set:Refrigerate for 2–3 hours or freeze for 45–60 minutes, until firm enough to slice cleanly.
- Optional coating:Unwrap the chilled logs and roll them in cocoa, powdered sugar, nuts, or coconut for a finished look. Re-wrap and chill 10 more minutes to set.
- Slice and serve:Use a sharp knife to cut 1/2-inch rounds.Serve as-is, or with coffee, tea, or ice cream or other.
Keeping It Fresh
- In the fridge: Wrap tightly in parchment or plastic, then place in an airtight container. Keeps for 1 week.
- In the freezer: Freeze logs for up to 2 months. Thaw in the fridge for 30–45 minutes before slicing, or slice carefully while semi-frozen for cleaner cuts.
- Prevent drying: Exposure to air makes the edges dry.Keep the logs wrapped snugly and return leftovers to the fridge promptly.
- Label your flavors: If you make multiple variations, label the parchment with a marker to avoid mystery logs.

Benefits of This Recipe
- Fast and low-effort: Minimal prep, maximum payoff. You’ll be done in under 20 minutes, chill time aside.
- Kid-friendly project: Mixing and shaping is fun for kids, and there’s no oven risk.
- Flexible ingredients: Works with dairy-free milk, seed butter for nut-free homes, and gluten-free oat flour.
- Party-ready: Slice a few varieties for a dessert platter that feels thoughtful without the fuss.
- Portion control: Slice as needed and keep the rest chilled to avoid leftovers going stale.
Pitfalls to Watch Out For
- Too sticky: If the dough clings to your hands, add more oat flour, 1 tablespoon at a time, until it’s workable.
- Too crumbly: If it falls apart when shaping, add a splash of milk and knead gently until smooth.
- Overloading mix-ins: Too many chunky add-ins can cause the log to crack. Aim for 1–2 cups total.
- Using raw wheat flour: Stick to oat flour or heat-treated flour for safety.Regular raw wheat flour is not recommended.
- Skipping the chill: Warm dough won’t slice cleanly. Chill fully for neat rounds.
Alternatives
- Chocolate Peanut Butter Log: Add 2 tablespoons cocoa powder to the dough and use peanut butter. Fold in chopped peanuts and chocolate chunks.
- S’mores Style: Use crushed graham crackers, mini marshmallows, and milk chocolate chips.Roll in more graham crumbs to coat.
- Fruit and Nut: Mix in chopped dried apricots, cranberries, and pistachios. Add orange zest for a bright twist.
- Cookies and Cream: Stir in crushed chocolate sandwich cookies and white chocolate chips. Roll in cookie crumbs for extra flair.
- Espresso Crunch: Dissolve 1 teaspoon instant espresso in the milk before adding.Fold in chocolate-covered espresso beans or toffee bits.
- Vegan and Dairy-Free: Use dairy-free butter, plant milk, and dairy-free chocolate chips. Choose a seed butter if nut-free is needed.
- Gluten-Free: Use certified gluten-free oat flour and gluten-free mix-ins. Check labels on cookies and candies.
FAQ
Can I use regular flour instead of oat flour?
Regular raw wheat flour isn’t safe to eat without heat-treating.
If you want to use it, heat it in the oven at 300°F (150°C) for 5–7 minutes, cool completely, then proceed. Oat flour is easier and naturally tasty here.
How do I make oat flour at home?
Blend quick oats or old-fashioned oats in a blender or food processor until very fine. Measure after blending for accuracy.
My dough is greasy.
What happened?
Too-warm butter or overmixing can cause greasiness. Chill the bowl for 10 minutes, then gently fold in a tablespoon or two of oat flour to bring it back together.
Do these taste like raw cookie dough?
Yes, but slightly richer and softer, thanks to the nut butter. They’re like a cross between cookie dough and a soft fudge.
What’s the best way to slice clean rounds?
Use a sharp, thin-bladed knife.
Warm the blade briefly under hot water and wipe dry between cuts for smooth slices.
Can I reduce the sugar?
You can cut the sugars by 25% without major texture issues. For larger reductions, add a bit more milk to keep the dough cohesive and consider sweet mix-ins like dried fruit.
Are these safe for kids?
Yes, as long as you use safe-to-eat flour (oat or heat-treated) and check for nut allergies. The no-bake method is great for cooking with kids.
How can I make them look gift-ready?
Roll chilled logs in a coating, wrap in parchment like a candy, tie with twine, and add a label.
Keep chilled until gifting.
Can I make bite-size versions instead of logs?
Absolutely. Roll tablespoon portions into balls, chill, and coat in cocoa, coconut, or sprinkles for no-bake truffles.
What if I don’t have nut butter?
Use sunflower seed butter or tahini for a nut-free option. Add an extra tablespoon of sugar if using tahini, which is less sweet and slightly bitter on its own.
Wrapping Up
No-bake dessert dough logs deliver big comfort with little effort.
They’re quick to make, endlessly adaptable, and easy to stash for later. Whether you keep them classic with chocolate chips or dress them up for a party platter, they hit that sweet, nostalgic spot. Chill, slice, share, and enjoy—no oven required.
Printable Recipe Card
Want just the essential recipe details without scrolling through the article? Get our printable recipe card with just the ingredients and instructions.