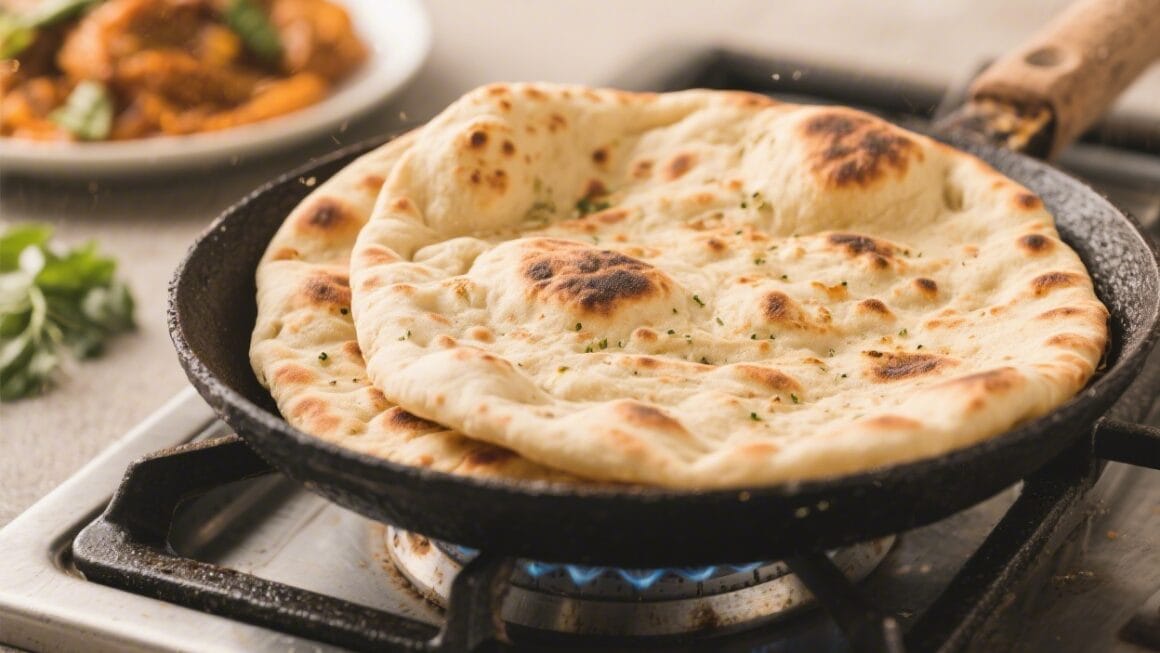
There are nights when warm bread would make the meal, but turning on the oven feels like too much. That’s where this no-oven dinner bread comes in. It’s soft, lightly crisp on the outside, and cooks right on the stovetop in a covered skillet.
The dough is simple to mix, forgiving to handle, and doesn’t require special equipment. Make it while your soup simmers or your pasta sauce bubbles, and you’ll have fresh bread on the table by the time you sit down.
What Makes This Special

- No oven needed: A lidded skillet or heavy pan does the job. It’s ideal for hot days, small kitchens, or anyone without an oven.
- Quick rise, quick cook: The dough is ready in about an hour, and each bread cooks in minutes on the stovetop.
- Soft and fluffy: The steam from the covered skillet gives you tender bread with a gentle chew and a light crust.
- Flexible format: Shape it as a round, a few small disks, or pull-apart pieces—whatever suits dinner.
- Budget-friendly: Pantry staples and a little oil turn into something that makes the whole meal feel special.
Ingredients
- 2 1/4 teaspoons active dry yeast (one standard packet)
- 1 cup warm water (about 105–110°F / warm to the touch)
- 2 teaspoons sugar or honey
- 2 1/2 cups all-purpose flour, plus more for dusting
- 1 teaspoon fine salt
- 2 tablespoons olive oil, plus extra for the pan and brushing
- Optional: 2 tablespoons plain yogurt or milk (for extra tenderness; reduce water slightly if using)
- Optional toppings: flaky salt, minced garlic, chopped herbs, sesame seeds, or grated Parmesan
Instructions

- Bloom the yeast: In a mixing bowl, combine the warm water and sugar or honey.Sprinkle the yeast over the top. Let it sit for 5–8 minutes until foamy. If it doesn’t foam, your yeast may be inactive or the water was too hot or cold.
- Make the dough: Stir in the olive oil and optional yogurt or milk.Add flour and salt. Mix with a spoon until a shaggy dough forms.
- Knead briefly: Turn the dough onto a lightly floured surface and knead for 3–4 minutes until smooth and elastic. Add small sprinkles of flour as needed to prevent sticking, but keep the dough slightly tacky—it yields softer bread.
- First rise: Place the dough in a lightly oiled bowl, turning it to coat.Cover with a clean towel or plastic wrap. Let it rise in a warm spot for 45–60 minutes, until doubled in size.
- Divide and shape: Punch down the dough to release air. For family-style bread, divide into 4 equal balls for thicker rounds or 6 for thinner ones.Keep unused pieces covered to prevent drying.
- Preheat the skillet: Use a heavy-bottomed skillet (cast iron is ideal) with a tight-fitting lid. Heat over medium for 3–4 minutes. Lightly brush with oil.
- Flatten the dough: On a floured surface, press one ball into a 6–7 inch round for thicker bread or 7–8 inches for thinner.Keep the edges slightly thicker for a nice puff.
- Cook covered: Lay the dough in the hot skillet and cover with the lid. Cook for 2–3 minutes until the surface looks puffy and the bottom has light golden spots.
- Flip and finish: Flip the bread, cover again, and cook another 2–3 minutes until fully cooked and golden in places. Adjust heat as needed so it browns without burning.
- Brush and season: Remove to a rack.Brush with olive oil or butter. Sprinkle with flaky salt, garlic, herbs, or Parmesan while hot if you like.
- Repeat: Cook remaining pieces, oiling the pan lightly between rounds if it looks dry. Keep finished bread wrapped in a clean towel to stay warm and soft.
Storage Instructions
- Room temperature: Wrap cooled bread in foil or store in an airtight bag for up to 2 days.
- Reheat: Warm in a covered skillet over low heat for 1–2 minutes per side, or 5–7 minutes in a 325°F toaster oven wrapped in foil.
- Freeze: Cool completely, then wrap well and freeze for up to 2 months.Reheat from frozen in a covered skillet or toaster oven, or thaw at room temperature first.

Why This is Good for You
- Simple ingredients: You know what’s in your bread—no additives or preservatives, just flour, yeast, water, and a little oil.
- Portion control: Making smaller rounds helps you serve exactly what you need and save the rest for later.
- Customizable fats and flours: Olive oil adds heart-healthy fats, and you can swap in part whole wheat for extra fiber.
- Less heat, more comfort: Stovetop cooking keeps your kitchen cooler while still delivering that warm-bread comfort.
Pitfalls to Watch Out For
- Water temperature: If the water is too hot, it kills the yeast; too cold, and the dough won’t rise well. Aim for warm bathwater temperature.
- Too much flour: It’s tempting to add lots of flour while kneading, but that leads to dense bread. Slightly sticky dough is okay.
- High heat: A hot pan is good, but too hot will scorch the outside before the center cooks.Keep the heat at medium and adjust as needed.
- Skipping the lid: The lid creates steam, which helps the bread puff and stay soft. Without it, the texture will be drier and flatter.
- Overproofing: If the dough rises too long and collapses, it can taste yeasty and cook unevenly. Check it at 45 minutes; it should look puffy and doubled, not bubbly and deflated.
Variations You Can Try
- Garlic-herb: Mix 1 teaspoon minced garlic and 1 tablespoon chopped parsley or rosemary into the dough.Brush hot bread with garlic butter.
- Cheesy top: After flipping, sprinkle grated Parmesan or mozzarella on the cooked side, cover, and let it melt as the second side finishes.
- Whole wheat blend: Use 1 cup whole wheat flour and 1 1/2 cups all-purpose. Add 1 extra tablespoon water if the dough feels stiff.
- Seeded crunch: Press sesame or nigella seeds onto the surface before cooking for nutty flavor and texture.
- Pull-apart bites: Divide dough into 12 small balls, flatten slightly, and cook in batches. Great for dipping in soup or sauce.
- Flatbread style: Roll thinner and cook briefly for a flexible wrap-style bread.Perfect for gyros or shawarma leftovers.
FAQ
Can I use instant yeast instead of active dry?
Yes. Use the same amount. You can skip blooming and mix instant yeast directly with the flour and salt, then add warm water and oil.
The rise time will be similar.
What if I don’t have a lid for my skillet?
Use a large heatproof plate or a baking sheet to cover the pan. It doesn’t have to be airtight—just enough to trap steam and help the bread puff.
How do I know the bread is cooked through?
The bread should feel light and springy when pressed. If the outside is browning too fast, lower the heat and give it another minute covered to finish the center.
Can I make the dough ahead?
Yes.
After the first rise, refrigerate the dough (lightly oiled and covered) for up to 24 hours. Let it sit at room temperature for 20–30 minutes before shaping and cooking.
Can I make it gluten-free?
Use a cup-for-cup gluten-free flour blend designed for yeast baking. Add 1 teaspoon xanthan gum if the blend doesn’t include it.
The texture will be different but still tasty; handle the dough gently.
What oil is best?
Olive oil adds flavor and moisture, but neutral oils like canola or sunflower work fine. Butter is delicious for brushing after cooking.
Why didn’t my bread puff?
Common reasons include inactive yeast, dough that’s too dry, or cooking without a lid. Also check heat: too low won’t create steam and lift; too high can seal the surface too quickly.
Final Thoughts
No-oven dinner bread is the kind of simple recipe that makes a weeknight feel cozy.
With a few pantry staples and a skillet, you get warm, soft bread that plays well with soups, salads, and saucy mains. Once you make it a couple of times, you’ll know your pan’s sweet spot and your favorite add-ins. Keep it easy, keep it warm, and enjoy the extra comfort on your table.
Printable Recipe Card
Want just the essential recipe details without scrolling through the article? Get our printable recipe card with just the ingredients and instructions.