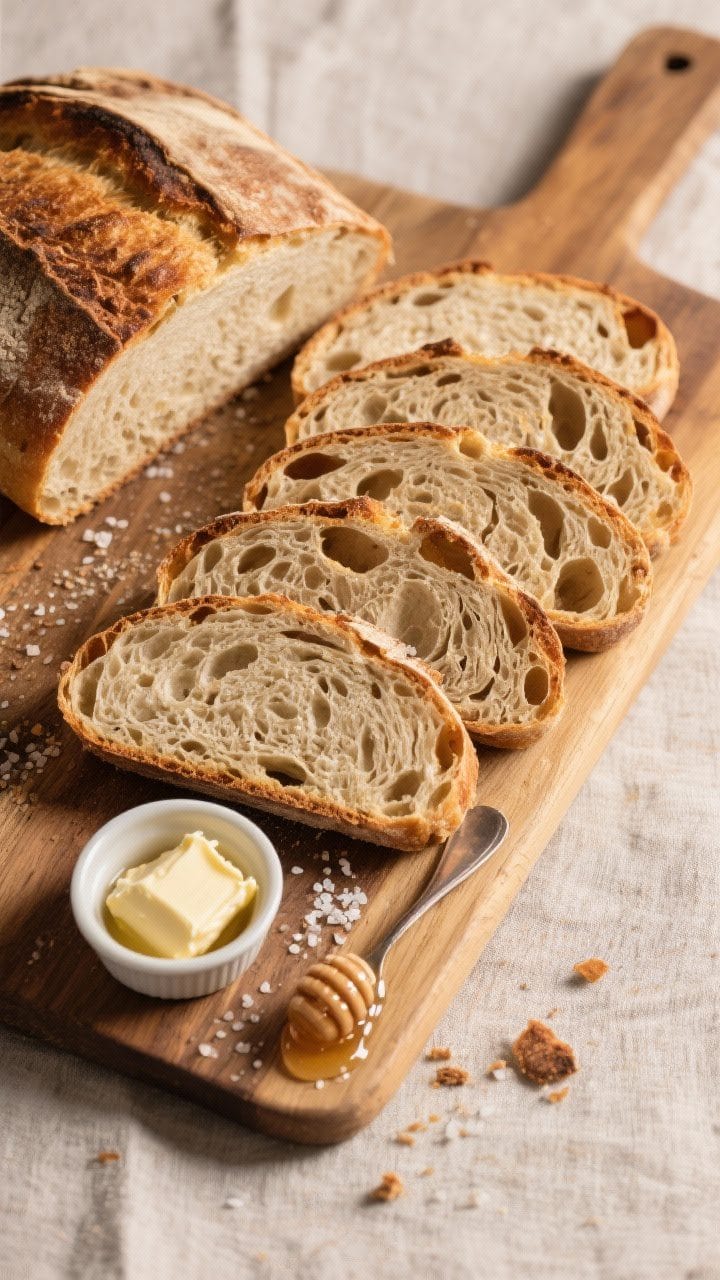
Nothing beats the smell of a fresh, crackly loaf coming out of your own oven. This bakery-style bread has a shattering crust, a soft, open crumb, and a deep, wheaty flavor—without special equipment or complicated steps. If you’ve been intimidated by bread baking, this method will change that.
It’s simple, reliable, and perfect for everyday sandwiches, toast, or tearing apart at the table. You’ll learn exactly how to get that signature crust using steam and a hot pot.
What Makes This Special
This loaf delivers a high-rise, crackly crust and a tender, open interior with minimal kneading. The long rest time does most of the work, building flavor and structure.
Baking the dough inside a covered pot traps steam, which is the key to that glossy, crisp crust you love from the bakery. It’s also a flexible recipe: you can swap in a little whole wheat, add seeds, or shape it differently. Best of all, it’s forgiving, beginner-friendly, and uses ingredients you probably already have.
Ingredients
- 3 cups (375 g) bread flour (all-purpose works too, but bread flour gives a chewier texture)
- 1 1/4 cups (300 g) lukewarm water (about 95–100°F)
- 2 teaspoons (8 g) fine sea salt
- 1 teaspoon (3 g) instant or active dry yeast
- 1–2 teaspoons sugar or honey (optional, helps yeast wake up)
- Extra flour for dusting
- Cornmeal or parchment paper to prevent sticking
Equipment: Large bowl, spatula or spoon, kitchen towel or plastic wrap, parchment paper, and a 6–7 quart Dutch oven with lid (or heavy oven-safe pot).
A baking stone and a pan for steam are optional alternatives.
Instructions
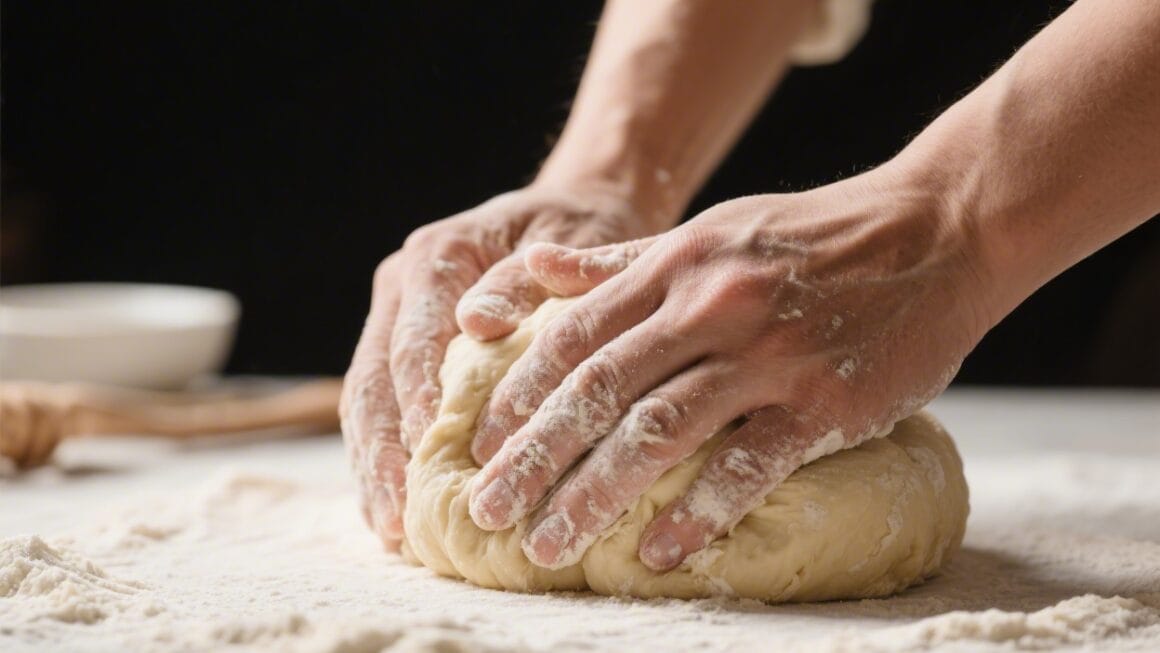
- Mix the dough. In a large bowl, whisk the flour, salt, and yeast. Add water (and sugar or honey if using). Stir with a spoon until no dry flour remains.The dough will be shaggy and sticky. That’s right where you want it.
- Rest and develop gluten (no-knead). Cover the bowl and let the dough rest for 60 minutes. After the rest, wet your hand and do 6–8 gentle “stretch and folds” around the bowl: grab an edge, stretch it up, and fold it over.This strengthens the dough without kneading.
- Bulk ferment. Cover again and let the dough rise at room temperature until doubled, about 1.5–2.5 hours depending on your kitchen temperature. It should look puffy with small bubbles.
- Shape the loaf. Lightly flour the counter. Turn the dough out, dust the top, and gently shape into a round by tucking the edges under to create surface tension.Avoid punching out all the air.
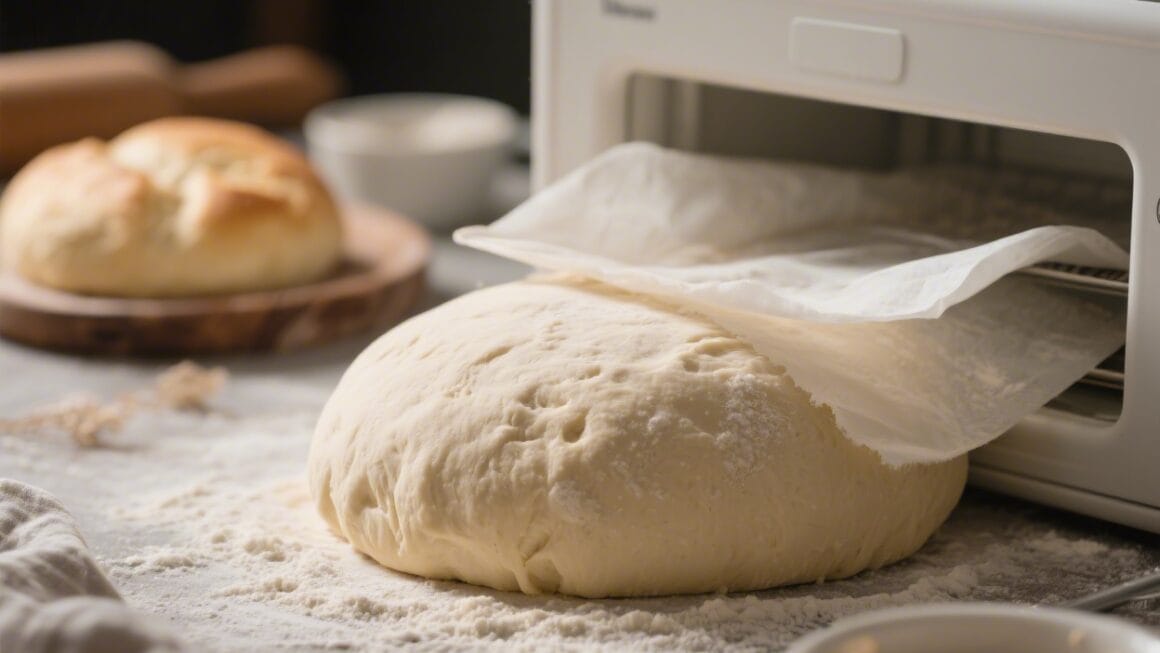
- Second rise (proof). Place the dough seam-side down on a parchment square dusted with flour or cornmeal. Cover with a towel and proof for 35–60 minutes, until slightly puffy. When poked, it should spring back slowly and leave a faint dent.
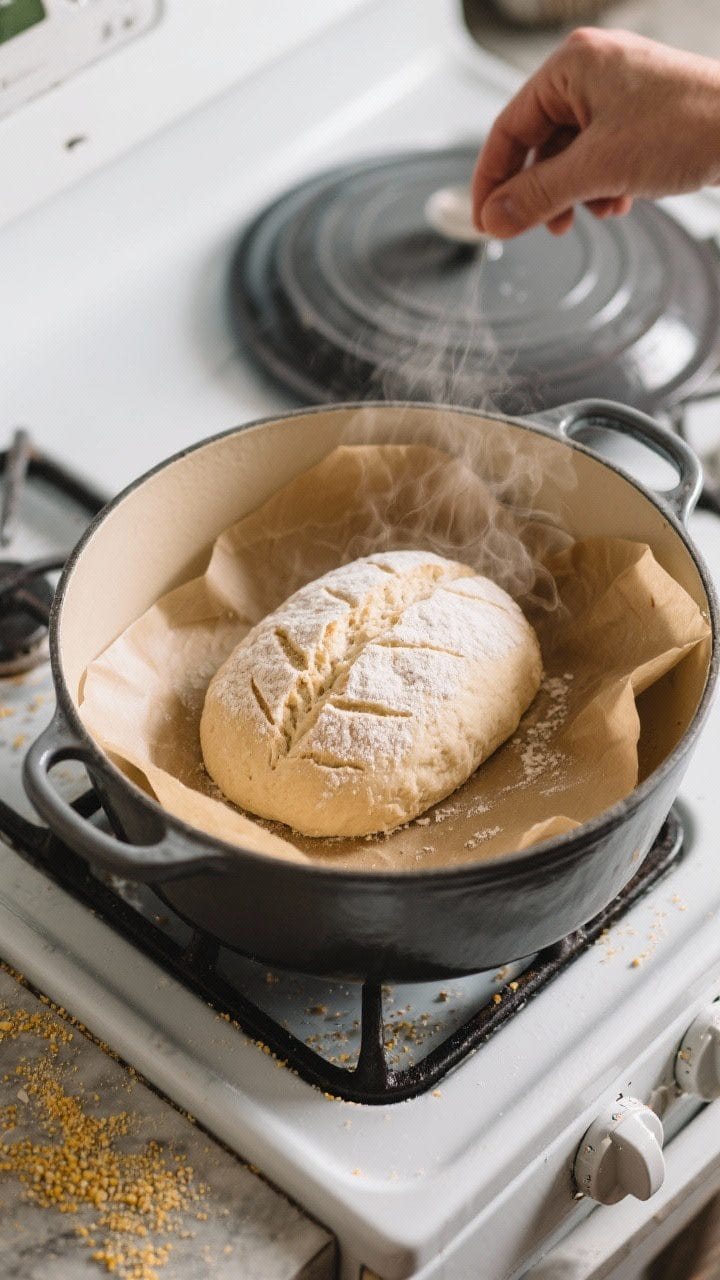
- Preheat the oven and pot. Put your Dutch oven with lid into the oven and heat to 450°F (230°C) for at least 30 minutes.A hot pot is essential for steam and oven spring.
- Score the dough. Just before baking, dust the top with flour and use a sharp knife or lame to make a 1/4-inch deep slash across the top. This controls where the loaf expands.
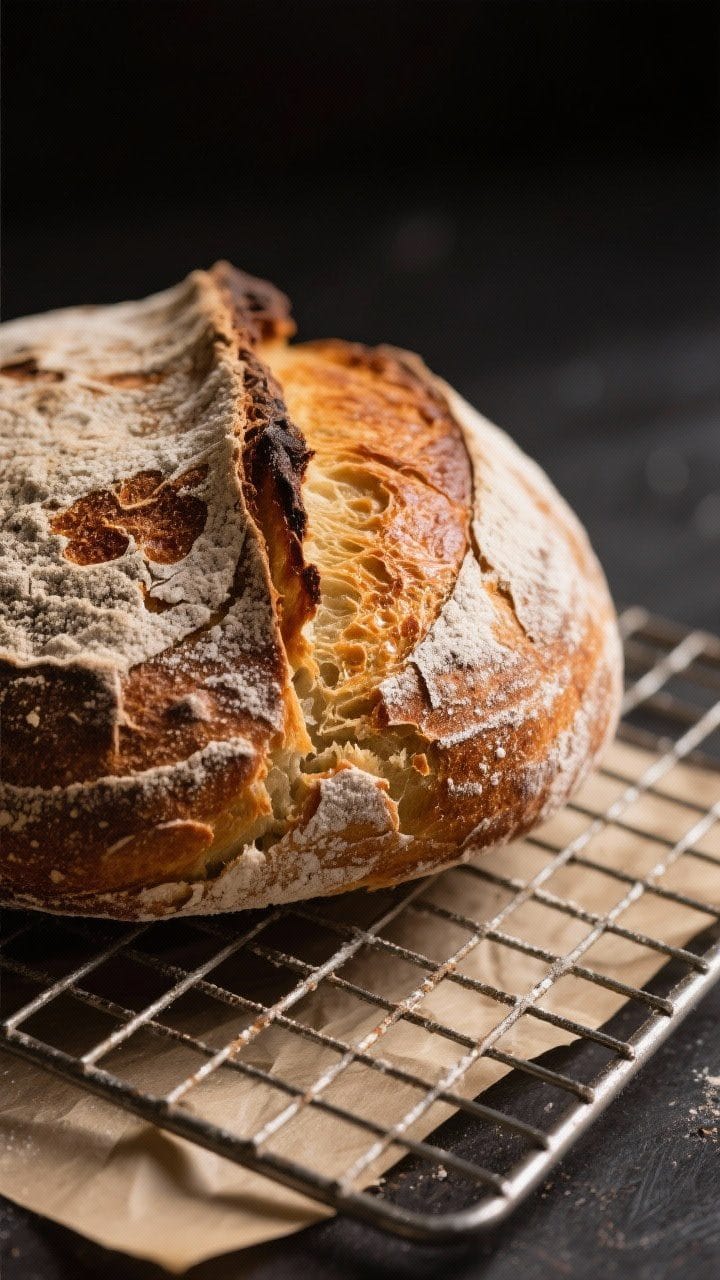
- Bake with steam (covered). Carefully remove the hot pot. Lift the dough by the parchment and set it inside.Cover and bake for 25–30 minutes. The steam will create a thin, shiny crust.
- Finish uncovered for color and crunch. Remove the lid and bake another 12–18 minutes, until deep golden brown and the crust sings. The internal temperature should be around 205–210°F (96–99°C).
- Cool completely. Lift the loaf out and cool on a rack for at least 1 hour.This sets the crumb and locks in moisture. Slicing too soon can squash the texture.
How to Store
- Room temperature: Keep the loaf cut-side down on a board or in a paper bag for up to 2 days. This preserves the crust.
- Avoid sealed plastic if you want the crust to stay crisp.Plastic softens it, though it does keep the bread soft inside.
- Freeze: Slice, then freeze in a zip-top bag up to 3 months. Toast straight from frozen.
- Refresh the crust: If it softens, bake at 375°F (190°C) for 8–10 minutes to re-crisp.
Health Benefits
- Simple ingredients: Flour, water, yeast, and salt—no additives or preservatives. You control everything.
- Better digestibility: The longer fermentation helps break down some starches and makes the bread easier on the stomach for many people.
- Good source of carbohydrates: Useful for energy, especially when paired with protein and healthy fats.
- Customizable nutrition: Swap in 20–30% whole wheat or rye for more fiber, minerals, and a fuller flavor.
Common Mistakes to Avoid
- Water too hot: Yeast is delicate.Keep water warm, not hot. If it feels like a warm bath, it’s good.
- Skipping the preheat: A blazing hot pot and oven drive oven spring and crust development. Don’t rush it.
- Overproofing: If the dough collapses when scored, it rose too long.Aim for a slow springy bounce when poked.
- Cutting too soon: Let it cool. Steam inside needs time to redistribute, or the crumb turns gummy.
- Too much flour during shaping: Extra flour can create seams that don’t seal. Use just enough to prevent sticking.
Alternatives
- No Dutch oven: Bake on a preheated stone or sheet.Add a pan of boiling water to the oven floor, or spritz the oven walls for steam during the first 10 minutes.
- Overnight flavor boost: After step 2, cover and refrigerate the dough for 8–24 hours. Shape cold, proof slightly longer, and bake as directed.
- Seeded crust: Roll the shaped dough in sesame, poppy, or sunflower seeds before proofing for extra crunch.
- Whole wheat version: Replace up to 30% of the flour with whole wheat. If the dough feels stiff, add 1–2 tablespoons extra water.
- Herb and garlic: Add 1–2 teaspoons dried herbs or 2–3 teaspoons finely chopped fresh herbs in the mix.For garlic, use roasted cloves to avoid raw bite.
FAQ
Can I use all-purpose flour instead of bread flour?
Yes. All-purpose flour works well and makes a slightly softer crumb. If you prefer more chew and bigger holes, bread flour is your best bet.
Do I need to proof active dry yeast first?
No, not if you mix it thoroughly with the dry ingredients and use lukewarm water.
If your yeast is old or you’re unsure, dissolve it in warm water with a pinch of sugar for 5 minutes to check that it foams.
How do I know my dough is ready to bake?
After the second rise, the dough should look airy and feel lighter. The poke test is reliable: a gentle poke should spring back slowly, leaving a slight indentation.
Why is my crust pale?
Usually the oven or pot wasn’t hot enough, or the lid came off too early. Make sure to preheat for a full 30 minutes and finish uncovered until the color deepens.
My loaf is dense.
What happened?
Common causes are underproofing, water that was too cool for the yeast, or using too much flour in shaping. Give the dough enough time to rise and keep it slightly tacky.
Can I double the recipe?
Yes, but bake the loaves one at a time unless you have two pots. Larger masses need longer proofing; watch the dough, not the clock.
How do I get bigger holes in the crumb?
Use slightly wetter dough, handle it gently, and extend the bulk rise until well aerated.
Bread flour also helps create a more open crumb.
Is a score necessary?
It’s helpful. Scoring guides the expansion so the loaf opens in a controlled, attractive way instead of bursting at random spots.
Wrapping Up
This crusty bakery-style bread is straightforward, satisfying, and hard to mess up. With a hot pot, a bit of patience, and a few simple techniques, you’ll get that golden, crackling crust and soft, flavorful interior every time.
Once you nail the basics, play with flours, seeds, and add-ins to make it your own. Warm bread on the table might just become your new weekly ritual.
Printable Recipe Card
Want just the essential recipe details without scrolling through the article? Get our printable recipe card with just the ingredients and instructions.